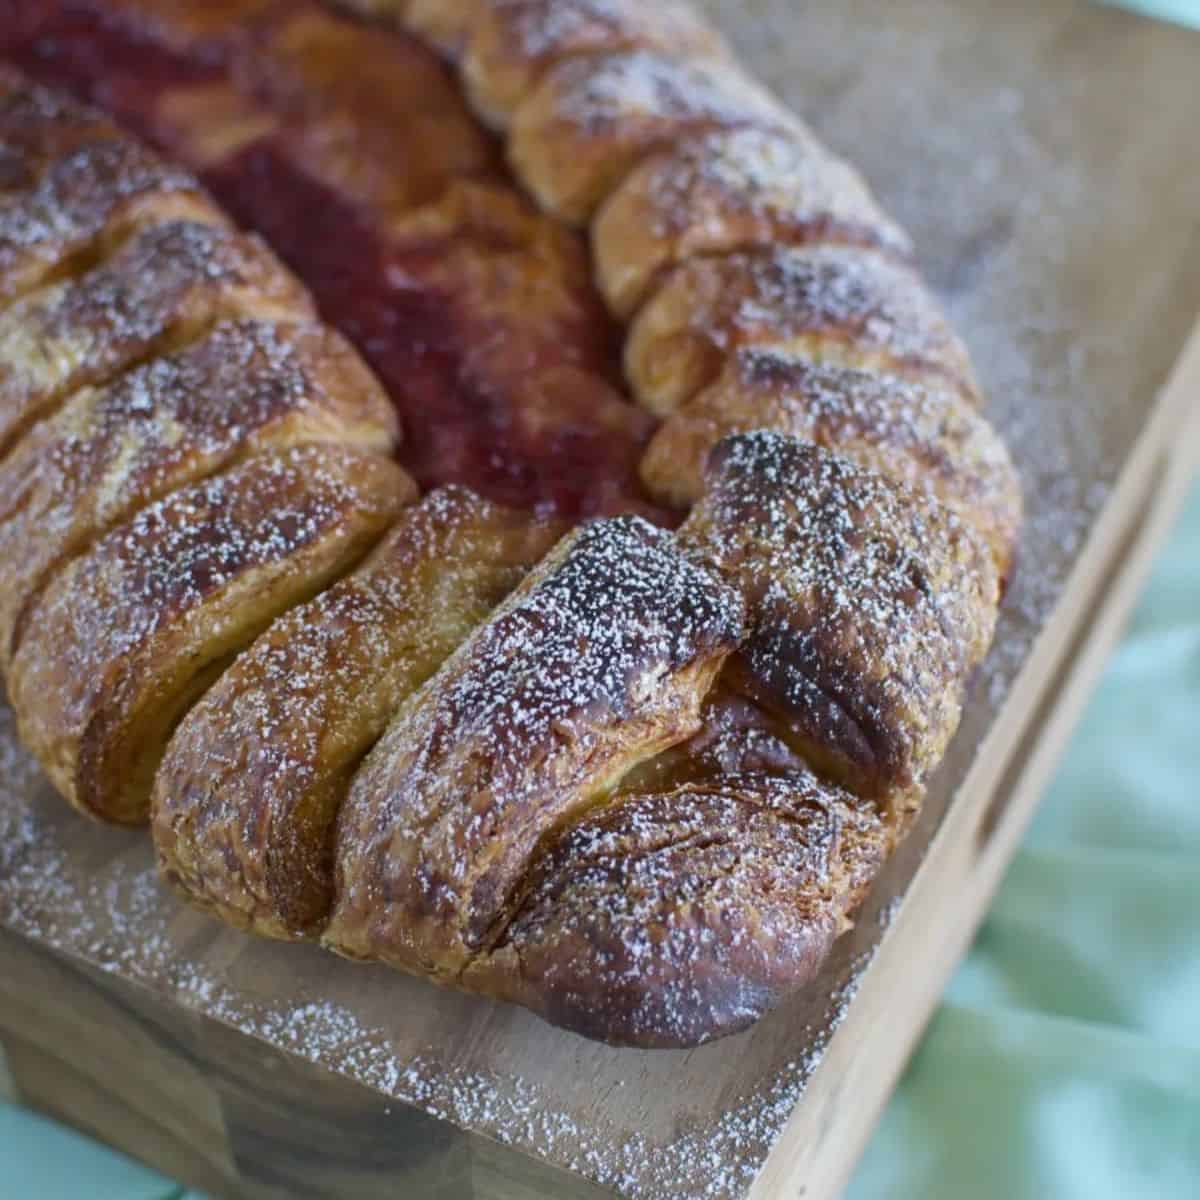
Impress your family or guests with this beautiful strawberry Danish braid—it's surprisingly easy to make and the results are bakery-worthy. With flaky pastry and sweet, juicy strawberries, it's the perfect treat for weekend brunches or special occasions.

Jump to:
I'm back! I am inspired, re-adjusted an very excited to get back into blogging because I sure have missed it.
I'll tell you all about what I've been up to later in the week but for now I am here to share something that as I bit into it I thought 'it's like biting into heaven, sweet, buttery heaven.'
One of the reasons I took a break from blogging is because for things like The Secret Recipe Club, I wasn't searching for the best-looking recipes, I was searching for the recipes I could make the fastest which really isn't the point.

This month I decided to challenge myself and make something that not only had I never made before, but something that had more steps than anything I've ever tried (apart from croissants but lets forget them shall we).
I was assigned to Grumpy's Honeybunch.
On Shelby's about page she writes that she's always up for a challenge so I think it was a sign that I needed to try something a bit different this month.

I'm not going to lie, there are a lot of steps involved but really, it's not that difficult. Just as a side note, I didn't quite catch on to how it was meant to be folded so mine looks more like a Danish slug but it was good, seriously, ridiculously good.
I messaged my husband after taking a bite and described it a croissant crossed with a scone only better.
It's all the delightful flakey, buttery goodness of a croissant without the pain-staking effort.
Seriously, look at those flakey layers. I'm right now mentally chastising myself for wanting to run straight to the freezer and grab a slice for afternoon tea.
It looks tricky to make but really, most of the time, the dough is resting in the fridge. There is probably 20 minutes hands-on time tops and it is totally worth it. I'm already dreaming up variations.

Even if you've never made pastry before, I really urge you to give this a go. If you've made bread then it will be a walk in the park and even if you haven't, this will be a very rewarding challenge. Enjoy!
What about you? Have you made anything like this before? What did you fill it with. What would you fill yours with if you've never made it?

Recipe
Strawberry Danish braid
Ingredients
Dough (Detrempe)
- 1 tablespoon active dry yeast
- ½ cup full-fat whole milk
- ⅓ cup caster superfine sugar
- Zest of 1 orange finely grated
- ¾ teaspoon ground cardamom
- 1 ½ teaspoon vanilla bean paste
- 2 large free-range eggs chilled
- ¼ cup fresh orange juice
- 3-¼ cups plain AP flour
- 1 teaspoon salt
Butter block (Beurrage)
- 250 g 2 sticks cold unsalted butter
- ¼ cup plain AP flour
Braid
- 1 quantity dough as above
- 1 cup strawberry jam
- 2 tablespoon of milk or one egg beaten
Instructions
- In the bowl of an electric mixer, beat the yeast and milk until just mixed together.
- Add the sugar, orange zest, cardamom, vanilla, eggs and orange juice and beat until well combined.
- Swap over to the dough hook and add the salt then with the motor running, slowly add the flour.
- When all the flour is mixed in, increase the speed to medium and knead for about 5 minutes or until the dough is smooth and no longer sticky (add a little extra flour if need be).
- Form the dough into a ball and place on a floured plate, cover with plastic wrap and refrigerate for 30 minutes.
- Meanwhile make the Beurrage.
- In the bowl of an electric mixer, beat the butter and flour together for one minute.
- Scrape down the bowl then beat the mixture for another minute or until it is smooth then set the bowl aside.
- When the dough has been in the fridge for 30 minutes, take it out and turn it out onto a floured surface.
- Roll the dough out to a rectangle approximately 35x25cm (18x13")and ½cm (¼") thick.
- If the dough is still sticky, dust it with a little bit more flour.
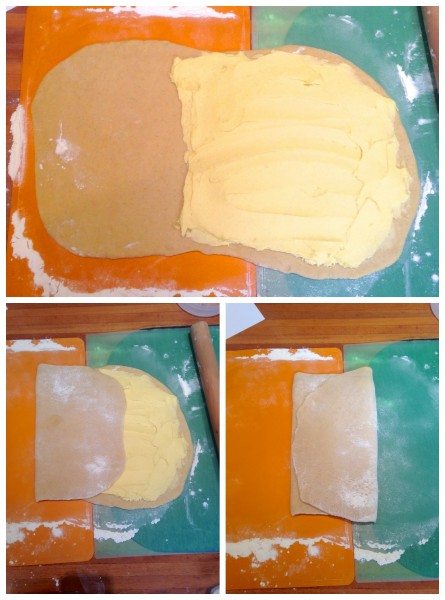
- Mentally (or with a little cut in the dough, divide it into thirds then spread the middle and right thirds with the butter mixture.
- Fold the left third of the dough over the middle of the dough to cover half the butter (sorry if this is a lot of maths!) then fold the right third over to form an envelope shape. Place the dough on a floured plate or something flat, cover it with plastic wrap and refrigerate for 30 minutes.
- That was the first turn. This needs to be repeated three more times for a total of 4 turns with 30 minutes refrigeration between each one.
- Each time, place the dough in front of you so that the open ends are your right and left then roll it out to the same size as above but you won't add anything this time just fold the thirds over and refrigerate again.
- After the final turn, the dough will need to be refrigerated for at least 5 hours or over night. If you're not going to bake it the next day, roll the dough out to 1 inch (2cm) thickness, wrap the dough in two layers of plastic wrap and refrigerate for up to 1 month. To defrost, place in the fridge over night.
- Line a baking tray with baking paper and set aside.
- On a lightly floured surface, roll the dough out to a 30x40cm (15x20") rectangle, ½cm (¼") thick.
- If the dough keeps bouncing back, just leave it to rest for a few minutes then try rolling it again.
- When it is rolled to size, transfer to the baking paper.
- Along one lone size of the dough, use a pizza cutter or sharp knife to make cuts ⅓ of the way across the dough leaving 2cm (1") between each one.
- Repeat on the other side of the dough making sure the cuts are aligned.
- Spread the filling down the middle, un-cut section of dough.
- Starting with one side, fold a flap down over the filling but on a light angle so it meets the start of the next cut on the other side, not the one it lines up with.
- Fold the first flap from the other side up and over it to cross it then repeat, alternating, all the way down the dough.
- Tuck in the ends.
- Use a brush to paste on the milk or egg wash.
- Lay a large piece of plastic wrap on the bench top and spray it with oil.
- Turn it onto the dough to cover it then leave it to rest for 2 hours or until doubled in size.
- When it has nearly risen, pre-heat the oven to 180C (400F) fan-forced.
- Bake the dough for 10 minutes then take the tray out and turn it around and turn the oven down to 160C (350F) and bake for a further 15-20 minutes or until golden.
- Serve warm from the oven or slice it up and toast the slices.
- I stashed my slices away in the freezer for quick delicious snacks.
Nutrition


JJ - 84thand3rd says
What a great recipe to return on! This is my first month back to SRC since July, I must spend a bit more time this month rather than picking the quickest thing...
Claire says
I think everyone does the same thing JJ. Reminds me I need to pick a recipe for next month!
Maureen | Orgasmic Chef says
There are a lot of steps to that recipe but I enjoy spending time in the kitchen. I too get in the rut that I've got to hurry or the blog post will be late. There's something to be said for bloggers who do a lot of restaurant reviews. :)
Claire says
Haha sure is! I like quick and easy recipes but a complicated one that's worth it always has a place.
Lorraine @ Not Quite Nigella says
Welcome back Claire! And what a lovely looking bread to come back with too! There are so many strawberries around at the moment!
Claire says
Thanks Lorraine! I got the biggest bargain on strawberries!
sarah k @ the pajama chef says
a danish slug! hilarious! this sounds really good. i've had danishes on my to-make list for awhile, so i need to try one soon :)
Claire says
Haha Danish slug indeed!
Couscous & Consciousness says
That would definitely be a challenge for me to make, but it sure looks worth it. I can imagine all kinds of great fillings and variations.
Claire says
Oh it's totally worth it!
erin @ she cooks, she gardens says
Look at those gorgeous folds of pastry, my mouth is watering. I am a complete noob when it comes to anything pastry-related but you've convinced me it's time to get out of my comfort zone and give things like this a go.
Welcome back to blogging land.xx
Claire says
Erin you really really have to try it. It is amazing and pretty satisfying too cause it looks so fancy and tricky. Thanks! x