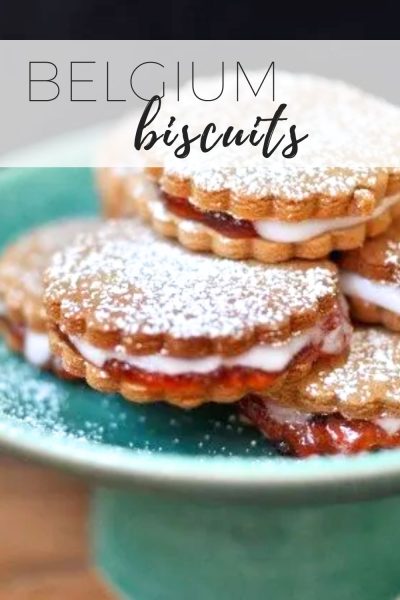
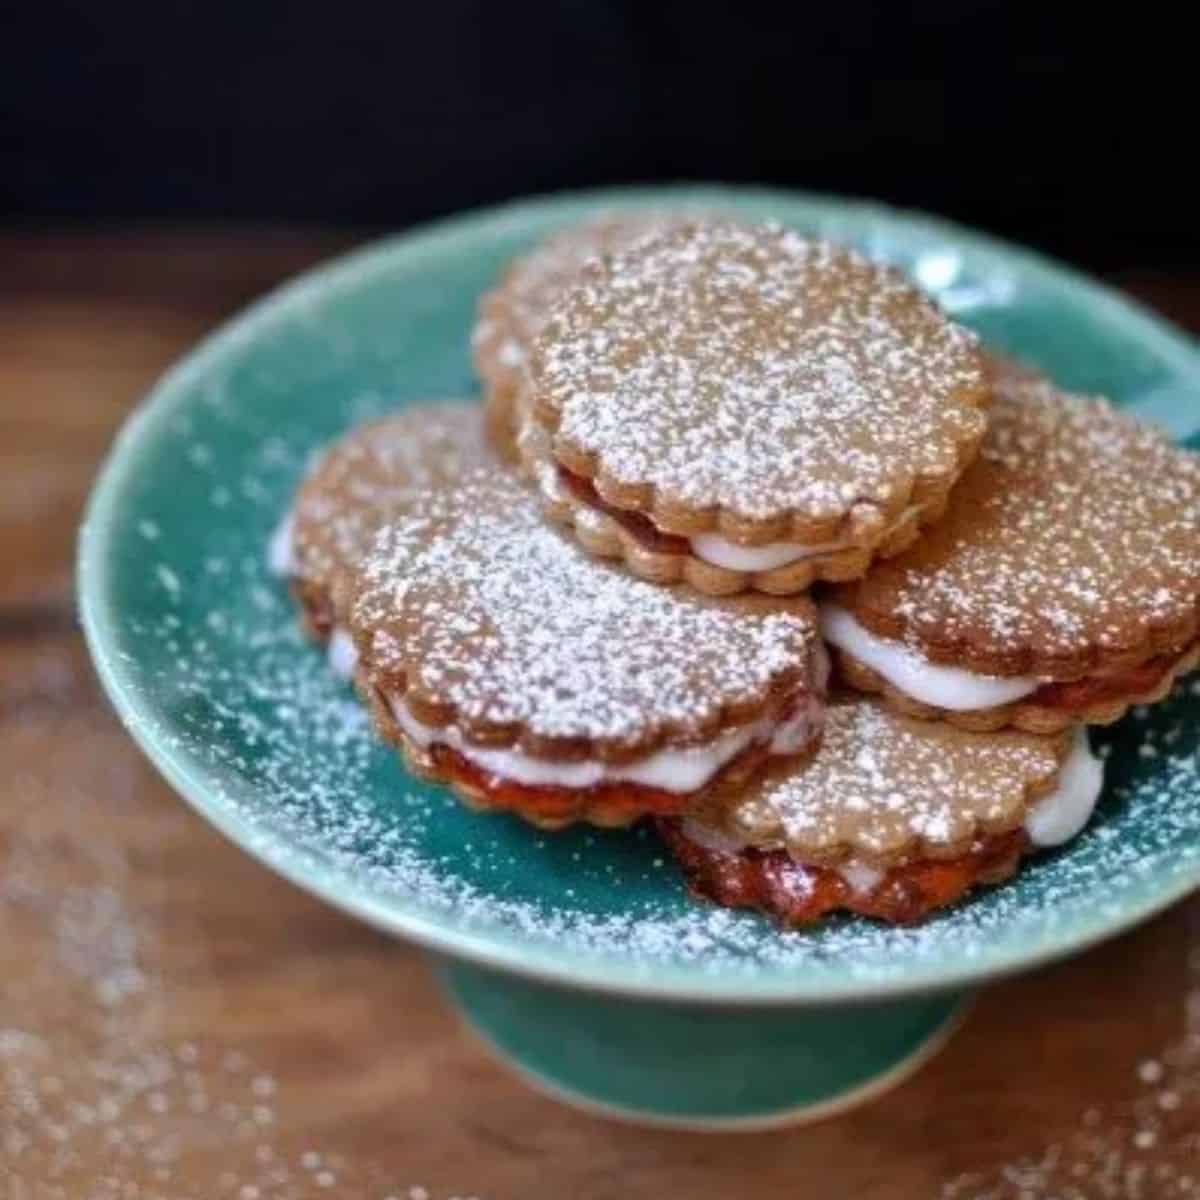
A delicious spiced cookie filled with jam and topped with sweet icing. The perfect sweet treat with a cup of tea.
Another delicious jam cookie is our Jam Drop Biscuits With Strawberry Jam.
Jump to:
I’m quite a visual person.
With my sewing,
I’ve never followed a pattern, I prefer to eye it out or ‘copy’ an item that I already have.
I like IKEA’s assembly instructions that are all images rather than something telling me to put the left thingimy on top of the right thingo making sure it lines up with the thingedybob on top.
I’m no different when it comes to recipes.
Sometimes no matter how clear the instructions might sound to someone else, without a visual, I’m unlikely to create anything resembling the original.

These Belgium biscuits were a victim of lack of visual aid.
Though they tasted great, they’re not exactly what the cook book author had in mind when they wrote the recipe.
At least now you can make them how they’re meant to be.
Ingredients
To make this delicious German biscuit you will need:
- Butter - softened (the pure stuff)
- Brown sugar - here's how to make brown sugar if you don't have any
- Egg - at room temperature
- Plain flour - also called all purpose flour
- Baking powder
- Ground cinnamon
- Ground ginger
- Mixed spice
- Cocoa
ICING/FILLING
- Icing sugar - here's how to make your own icing sugar
- Strawberry essence - you could use vanilla if you can't get strawberry
- Red or pink food colouring
- Water
- Strawberry or raspberry jam

Instructions
I always like to measure out my ingredients before I start baking.
That way I don't forget anything.
Start by lining a large oven tray (or two trays) with greaseproof paper.

Butter and sugar
Place butter and sugar in the bowl of an electric mixer and cream together using the paddle attachment.
Alternatively you could use a wooden spoon to cream butter and sugar together.

Scrape down the sides with a spatula and add the egg then beat it through.

Take the bowl off the stand and sift in the dry ingredients - flour, baking powder, cocoa and spices.
Then you can either put it back on the stand and mix it all together or use a spoon.
You could have guessed that I used the mixer.
Mix it until the dough comes together in the middle.

Turn the cookie dough out onto a lightly floured surface and shape the dough into a ball.
It was easiest to work with half of the dough at a time as it was quite a firm dough, so I cut it in two and set one piece aside.
At this stage you could also shape the dough into a disc and wrap in plastic wrap (aka cling wrap) and refrigerate or freeze for later.
The dough at this stage smells rather amazing. It took a little bit of control not to nibble a bit off.

Use a floured rolling pin to roll dough out to about 3mm thickness then cut out rounds with a 6.5 cm biscuit cutter.
I thought I’d go a bit fancy and use the cutter with a scalloped edge but you can use a round cookie cutter.
I wasn’t sure the dough would hold the shape while baking so I tried one out before I cut them all like this.
It actually kept it’s shape really well so would be another good recipe to use for shaped biscuits like tea bag biscuits.

Place the dough rounds on the prepared baking trays leaving just 2cm between each one.
They don’t really spread at all.
Bake the biscuits at 180C fan-forced for 15 minutes or until they are golden.

Leave them to rest on the trays for 5 minutes.

Meanwhile make the pink icing.
Mix icing sugar, essence and pink food colouring with a little hot water until it becomes spreadable icing.
Start with about a tablespoon of water and add a little at a time.
If it gets too runny, add more icing sugar.

Transfer the golden brown biscuits to a wire rack to cool completely.

Now here is where my lack of visual aid got me into a bit of trouble.
The recipe simply said ‘ice half of the biscuits and coat the un-iced biscuits with jam.’ Re-reading it now, I can totally see what it’s meant to mean.
A finished biscuit should go biscuit, jam, biscuit, icing.
I had in my head that the icing and jam were the filling.
I turned them all over, spread half the insides with jam and half the insides with icing then sandwiched them together.


As the end result still tasted the same as what they should have, I dusted them with icing sugar and pretended that’s exactly what they were meant to look like.

The combination of spices, cocoa, icing and strawberry was quite a treat.
Enjoy!
What about you?
Do you need to see things to work out how to do them or are you ok with written instruction?

Recipe
Belgium biscuits
Ingredients
Biscuit
- 125 g 4.4oz butter, softened
- ¼ cup brown sugar
- 1 egg
- 2 cups plain AP flour
- 1 teaspoon baking powder
- 1 teaspoon cinnamon
- 1 teaspoon ground ginger
- 1 teaspoon mixed spice
- 1 teaspoon cocoa
Icing
- ¾ to 1 cup icing sugar
- ¼ teaspoon strawberry essence
- a few drops of red food colouring
- water
Filling
- ½ cup strawberry jam
Instructions
- Pre-heat the oven to 180C(356F) fan-forced.
- Line two baking trays with baking paper or grease them.
- Beat the butter and sugar together in the bowl of an electric mixer.
- Add the egg and mix it through.
- Scrape down the sides and mix again then add the sifted flour, baking powder, cocoa and spices and mix until the dough comes together.
- Lightly flour a work surface and roll the dough out until it is 3mm thick.
- Use a 6.5cm cookie cutter and cut out rounds of dough.
- Place them on the lined baking trays leaving 2cm between each one.
- Bake the biscuits for 15 minutes or until golden.
- Leave the baked biscuits on the tray for 5 minutes then transfer to a wire rack to cool completely.
- Meanwhile make the icing by adding a little water at a time to the icing sugar, essence and colouring until it is thick but spreadable.
- When the biscuits have cooled, spread half with icing.
- Spread the other half of the biscuits with jam and place the iced biscuits on top of the jam covered ones.
- Sprinkle with icing sugar to serve.
Nutrition


Miz Kaz says
Hi Claire,
I have that cook book too, and it drives me nuts without the pics lol. I can see how the biscuits came to be ;)
Claire says
It's tricky isn't it. Although sometimes it can be better if yours doesn't turn out like the photos you'll never have to know!
Angi says
I had one of these today at a bakery, and they had done exactly as you: jam and icing in the centre. The difference was they had a cut out in the top cookie, so the jam was visible (and fancy). So delicious that I looked up your recipe so I could make them myself.
Claire says
Oh good so I'm not the only one to make them with everything inside! That would be a pretty idea I'll have to remember for next time.
Kara says
Your biscuits look so cute, I have never seen a Belgian biscuit like that before, in NZ we normally top the icing with pink or red jelly chrystals, but I think your version looks more grown up :)
Claire says
Thanks Kara! I like the sound of grown up. It was by accident and lack of reading the recipe in truth but I kind of like them this way too.
sian says
I do like to be able to see the end product as well as a couple of pics along the way, where it may be difficult to understand by word only (such as "thick batter" or "until it makes a fine crumb") but for the basics, like flour and sugar and melted butter, I find the pictures a little distracting as it gets in the way of my ability to read the recipe!
Claire says
Thanks for your feedback Sian. I like to show all the steps because I never know what sort of experience a reader has. I also include the full recipe at the bottom of the post so if you don't need the step by step photos you can skip straight to the recipe. Enjoy!
Emilie@theclevercarrot says
These look delicious Claire! I feel like I could smell them baking as I was reading (if that makes any sense...) Such a nice combination of spices. And I love that blue stand you have them on!
Claire says
Just the raw dough smelled amazing Emilie! Thank you, I bought it in Thailand on our honeymoon.
Glamorous Glutton says
Your version looks great. I love the idea of biting through the crisp biscuit and then having the icing and jam squelching out. Sometimes mistakes make a better dish. GG
Claire says
Yes you're right. I'm sure some of the best discoveries have been accidents.
Lorraine @ Not Quite Nigella says
I made these for my homesick NZ friend Queen Viv and she loved them! I also used the Edmonds cookbook just for that authentic NZness ;)
Claire says
I haven't had a bad recipe from it yet!
The Cafe Sucre Farine says
Claire, I like your version much better than the original! They look very enticing with both of those fillings oozing out just a bit. I bet these cookies are fantastic even without any filling!
Claire says
I like that theory Chris. Oozing and sweet treats go very well together don't they?
Maureen | Orgasmic Chef says
These little beauties look wonderful, Claire! Your food is always heaps more attractive than mine and I want it to stop. :) Maybe I'll just have to pick up my game.
Claire says
I think you're just too harsh on yourself Maureen. Your food looks amazing!
Kristin says
I must admit I am never as excited about recipes that don't have a finished picture. Except Julia Child's and Stephanie Alexander's cookbooks... but I read these like novels not cookbooks!
Claire says
The photos definitely make it prettier! Me too but you already know that, I'm sure it's just one of the reasons we're friends!
vanessalilllian says
Sometimes new recipes or techniques make my head explode. Like one time I made a brioche, and I was waiting for the dough to meet the description in the recipe and nearly stopped the mixer a dozen times. But then suddenly it came together and there was no doubt in my mind that I'd been right to keep mixing... but I'm certain plenty of people would have stopped just shy of it. If only there had been a picture of what the dough that had come together looked like, they would have saved a lot of heartache! I still think your biscuits look good, though. Dusting with icing sugar always makes things look a little bit fancy :)
Claire says
Exactly! That's why I like to share the process photos as well. So many times when I'm making something I wonder if it's meant to look the way it does.
Aww thanks!
Hotly Spiced says
Ha, ha. That's so funny. That's exactly the sort of thing I would do. I made a cake a few weeks ago, popped it in the oven and then saw two eggs sitting on the kitchen bench. Hmm, think those were supposed to be in the cake! Never mind, it turned out to be a great tasting cake - egg free! Your biscuits look amazing Claire even with their two fillings. Love how you repaired the damage with a sprinkle of icing sugar. Who would know! xx
Claire says
Oh I've done that before with other ingredients Charlie! At least you made a great discovery from your mistake. Isn't icing sugar the best?!