
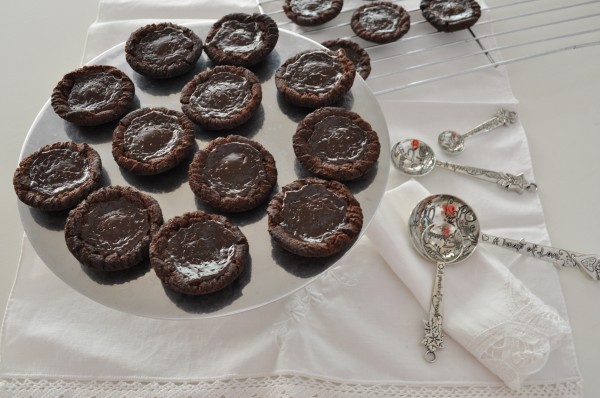
Brown sugar pavlova, a gingerbread house and salted caramel chocolate tarts. What do they all have in common? They're all my contributions to the Sweet Adventures Blog Hop. The theme this month is 'death by chocolate.' A few weeks ago my grandma gave me a recipe for chocolate salted caramel tart and when I heard this month's theme I knew this recipe was the one, with a few tweaks of course.

I chocolated it up a bit more by using chocolate biscuits in the base then decided, why not make the biscuits into bases? When I was younger these were always my favourite biscuits in the family packs and they're fantastic made into mini tarts. It's a little bite full of devilishly delightfully rich chocolate with a surprisingly smooth salted caramel center. Don't let their rugged appearance fool you, these tarts are heavenly.

The recipe is a little bit involved but really the hardest part is making the caramel. I had a lot of caramel leftover from this which I've frozen to make into a tasty treat at a later date. It can be used for anything - drizzle it over ice-cream, ice a cake, fill macarons or biscuits, make a milkshake. I'll leave it to your imagination.

There are only two biscuits in the photo because these were my test biscuits. If they didn't work I was going to make the base according to the recipe so I didn't want to use too many in case of failure. You will need a patty cake tin to make these. Place the biscuits face-up on top of each hole and bake them at 180C fan-forced for about 10 minutes. Keep an eye on them though because you don't want them to burn.

As soon as they come out of the oven, gently push them into the tin to make little cups. If they're too hard put them back in the oven for a few minutes.
Leave them to cool in the pan.

To make the caramel, put the butter, sugar, golden syrup and condensed milk in a saucepan.

Heat the mixture over low heat, stirring, until everything has melted and combined.

Now up the heat a little until it reaches a gentle boil and keep it like this, stirring until is thickens and turns fudge-like. The recipe said that this takes 8 minutes but mine took more like 15.

Take the caramel off the heat and stir in the salt. Whoever first though of the idea of adding salt to caramel is a genius. It's my favourite macaron flavour and I could eat the stuff by the spoonful.

Place a blob of the caramel in the middle of each biscuit cup and set it aside to cool.

Meanwhile make the chocolate topping. I chose the lazy route (for a change) and heated the cream in the microwave. To do this, pour the cream into a microwave-proof bowl and zap it for 20 seconds at a time until it starts to bubble. As soon as it gets to this stage add the chocolate then let it sit for about 30 seconds. Be careful not to over-heat the cream..

Stir it all together until it is lovely and smooth then set it aside to cool to room temperature.

Whisk in the egg yolk and the vanilla.

Pour the chocolate topping into the biscuit bases. Bake the tarts at 180C fan-forced for about 10 minutes. Be sure to check on them so the biscuits don't burn!

Leave the tarts in the tin to rest for about five minutes.

Transfer them to a wire rack to cool completely.

I think these would make a great addition to the sweet layer of a high tea or they'd be delicious served with ice-cream. Enjoy!
Don't forget to check out all the other fabulous death-by-chocolate posts in the Sweet Adventures Blog Hop.
Recipe
Salted caramel chocolate tarts - death by chocolate sweet adventures blog hop
Print Pin Rate SaveIngredients
- 1 packet of choc-ripple biscuits
- 175 g 6oz butter
- 175 g 6oz caster (superfine) sugar
- 4 tablespoon golden syrup
- 1 400 g 14oz can of condensed milk
- 1 heaped teaspoon Maldon sea salt
- 100 mL 2oz cream
- 110 g 4oz dark chocolate
- 1 egg yolk
- ½ teaspoon vanilla extract
Instructions
- To make the biscuit cups, preheat the oven to 180C (356F) and place the biscuits right way up in a patty cake tin.
- Bake them for about 10 minutes then take the tin out of the oven and quickly press the biscuits into the tin to make little cups. If they're still a bit firm put them back in the oven for a few more minutes.
- To make the caramel place the butter, sugar, golden syrup and condensed milk in a saucepan and stir it all together over low heat until everything has melted.
- Bring it to a gentle boil, stirring, until it thickens and turns fudge-like. The recipe says that this take 8 minutes but mine took closer to 15.
- Take the saucepan off the heat and stir in the salt.
- Place a blob of caramel in the middle of each biscuit cup and set them aside to cool.
- To make the chocolate topping place the cream in a heat-proof jug and microwave it in 20 second bursts until it begins to bubble.
- Add the chocolate to the cream and leave it to sit for 30 seconds then stir it until the mixture is smooth. Leave it to cool until it reaches room temperature.
- Whisk in the egg yolks and vanilla. Spoon the mixture over the caramel.
- Bake the tarts at 180C (356F) fan-forced in a preheated oven for 10 minutes.
- Leave them to cool in the tin.
- These would be lovely with ice-cream and are deliciously rich on their own.


Christina @ The Hungry Australian says
My word, these look fantastic. There are so many different things going on with these biscuits - and all of them have me drooling. So glad you joined this blog hop!
Claire says
So glad you hosted it!
Jennifer Wickes says
Not only does your recipe look amazing, but I love those spoons!
Claire says
Thanks Jennifer! I've had a few comments on the spoons.
JJ @ 84thand3rd says
What a great idea to use whole biscuits - I never would have thought of forming them this way - I bet Anzacs would do the same thing...hummm! These look divine. I love those little spoons in the pic - where are they from?!
Claire says
I thought they'd go hard in the oven but it was perfect. Yep Anzacs would work too. The spoons were from Santa - they're from Noosaville and 'he' is still trying to remember exactly where. I will let you know.
JJ @ 84thand3rd says
Santa's memory is tricky like that ;) Would love to know if he works it out!
Claire says
I will!
Tenille @ My Family Table says
These look so lovely, I think they'd go down a treat at work. They remind me of some little brandy snap biscuit tarts I used to make.
Claire says
I've seen a similar thing made made with ginger snaps too.
Monica (@gastromony) says
Lovely :) Salted caramel is certainly something else!
Claire says
It is indeed!
Miss Kimbers @ Fruit Salad and Mixed Veg says
hehe the chocolate ripple bisucits were my favourite in the family pack too. My least favourite were those rectangle vanilla ones with the cream between the two biscuits.
These tarts look like fun:)
Claire says
Oh I know the ones and totally agree. They had a funny texture.
Celia says
Clever recipe, Claire! :)
Claire says
Thanks Celia!
Lorraine @ Not Quite Nigella says
Oh my goodness I can't stay Claire because I can stop drooling. I've just made a cup of tea and all it needs is one of these. Do you mind terribly teleporting me one of them? :P
The Kitchen Crusader (@KCrusader) says
I LOVE the combination of salt and sweet. I definitely have to try these.
Claire says
It's delicious!
tania@mykitchenstories says
This is such a great idea. I am going to give these a whirl. They look so good. Thanks for posting
Claire says
Thanks Tania. I hope you enjoy them.
Kyrstie @ A Fresh Legacy says
Hi Claire, that caramel looks amazing, I wanted to dip a spoon into it!
Claire says
I just might have :-)!
Hotly Spiced says
How good is salted caramel! Your caramel in the saucepan looks so delicious. Love your little cakes. Great recipe. I'm sure they didn't last long - probably only long enough for you to take the photos!
Claire says
So good! I actually took them over to my grandma because I knew where they'd end up otherwise and I have a wedding dress to fit into!
K-bobo @ Gormandize with A-dizzle & K-bobo says
What a great idea to use the chocolate biscuits as the base! I will definitely have to try out a veganised version of this one!
Claire says
I guess it would work with different biscuits too. Let me know how you go!
Nic says
Agreed, great idea to use biscuits, much easier than making pastry! and they look delicious. I have a bit of a caramel phobia, it just never seems to work for me, but maybe I'll give it another try one day...
Claire says
When I tried to make caramel for macarons once I gave up after burning the third attempt. This recipe was pretty fool-proof in my opinion.
Jennifer (Delicieux) says
I nearly made a salted caramel chocolate tart! Great minds think alike Claire ;)
Your tarts look so delicious. I love that you've used chocolate ripple biscuits as the base. So easy and delicious!
Claire says
The do indeed! The bases were so quick and easy to make. I think a lemon tart sort of filling would be good with them too. Ooh or cheesecake!
Lizzy (Good Things) says
Oh yum... I am going to bookmark this for later... I so want to make that salted caramel!!!!
Claire says
It's so delicious! I made way too much so have a whole lot of it in the freezer for later. I hope it defrosts well!