
I know I harped on about not choosing favourites in yesterday but another battle has arisen - thick or thin crust pizza? I was a thin crust only girl until the other night when I tried out a new recipe.
Oh boy was this pizza good. It could have been spread with a little olive oil and salt and I would have gobbled it up in no time.

If you think making pizza at home is hard then this is the recipe for you. If you have a stand mixer then the only work involved is measuring a few ingredients and deciding what to top your pizza with.
It is so very simple and the best homemade pizza recipe I've come across so far.
I promise you won't be disappointed!

Put the warm water in the bowl of an electric mixer and then add the yeast and honey and stir them in. Leave them to sit for 5-10 minutes or until the yeast starts to froth. I've found the best temperature for the water is about 105F.

Sift in the oil, half the flour and the salt and set the dough hook to work until everything is almost mixed in.

Then with the mixer running, slowly add more and more flour until the dough looks sort of like this. You want to be able to gently touch it with your finger tip without any dough sticking to your hand.
All the hard work is up to the mixer. Turn the speed up to high (I used about 8 on my KitchenAid) and set a timer for 6 minutes. It seems like a very long time but it worked perfectly.
Don't walk too far away though. It might just be my mixer but it was slowly creeping forward and I fear that without supervision it might have gone for a dive off the bench.

It was as this point that I realised the mistake I have been making with my bread making. Obviously I've never kneaded bread enough because this was the first time I've ever had a nice smooth dough.
When it's ready, the bowl will be nice and clean and you'll have a nice ball of dough.

Oil up the bowl and pop the dough back in it. Spray the dough lightly with oil and then cover the bowl and leave the dough to rest for 1-2 hours or until it doubles in size.

This is what mine looked like after two hours. It was huge!

I couldn't resist giving it a big punch. You need to do that anyway. Punch it down and take it out of the bowl.

The recipe makes enough for two regular size pizzas (about a delivered pizza size) so divide it in two.
Just before you start, pre-heat the oven to 200C and if you have a pizza stone, put it in the oven.
There's no real technique to shaping it. If you have any skills you can throw it around like the Italians. I just held one side of it up and kept turning it and it shaped itself.
I flattened it a little more in the middle and left the edges nice and thick so they'd puff up.
Spread the base with whatever sauce you'd like.

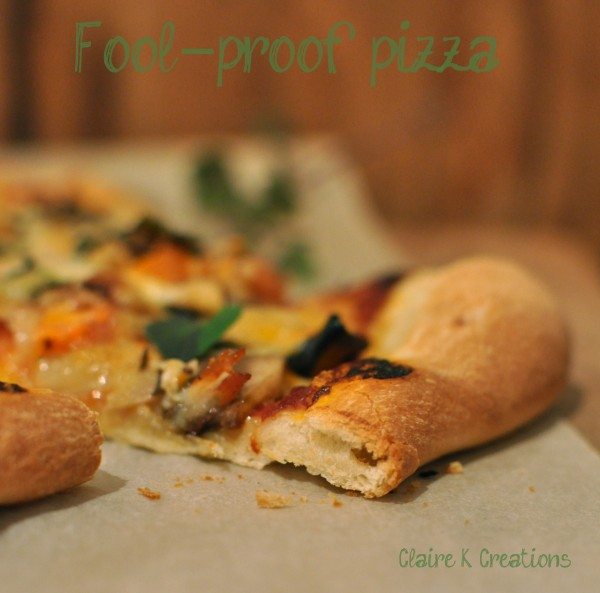
Then add some toppings. I used roasted eggplant, sweet potato, some leftover roast chicken, feta, cheese and herbs from the garden. I also brushed the crust with a little olive oil.
Carefully transfer the pizza into the oven and cook for about 20 minutes or until the crust is golden and your cheese has melted.

The one pizza was enough for the two of us so I froze the dough for another day. Wrap it in plastic wrap and then a zip lock bag and put it straight in the freezer. I left mine on the bench while we were eating and it nearly burst the bag. It will keep rising until the freezer chills it.

I was so impressed with the result. The base was just thick enough to have a bread-like consistency but not so thick as to steal the show from the toppings. I loved the puffed up crust. It might have been nice with a little bit of stuffing.
I'll save that idea for next time. Ooh calzones would be delicious with this recipe too or maybe garlic bread... I'll leave it to you.

Doesn't it look like the pizza is eating itself? No? Just my childish sense of humour?
What about you? Do you prefer thin crust or thick or something in between?

Recipe
Ingredients
- 1 cup warm water
- 2¼ teaspoon active dry yeast
- 1 tablespoon honey {or sugar}
- 2 teaspoon salt
- 2 tablespoon olive or canola oil
- 3 cups bread flour give or take ½ cup
Instructions
- In the bowl of an electric mixer, combine the water, yeast and honey. Set it aside for 5-10 minutes or until the yeast starts to froth.
- Sift in half the flour, the salt and the oil and mix using the dough hook until combined.
- With the motor running, slowly add the rest of the flour until the dough is the consistency that you can tough it without it sticking to your fingers (I used 3 cups).
- Turn the mixer to high and set a timer for 6 minutes. Let it knead the whole time.
- Take the dough out of the bowl and shape it into a ball. Oil the bowl and put the dough back and then spray the dough with a little oil.
- Cover and let it sit for 1-2 hours or until it has at least doubled in size.
- Punch down the dough and divide it in half.
- Shape into a pizza and coat with toppings.
- Bake in a pre-heated oven at 200C (392F) fan-forced for 20 minutes or until the crust is golden.
- Un-cooked dough can be frozen. Wrap in plastic wrap and then a ziplock bag.
Recipe

Ingredients
- 250 g water
- 1 tablespoon active dry yeast
- 1 teaspoon honey {or sugar}
- 1 teaspoon salt
- 10 g olive oil
- 440 g baker's flour
Instructions
- Place the water, yeast and honey in the bowl of the Thermomix and heat 2 min, 37 degrees, speed 2.
- Add the flour and salt and mix 10 seconds, speed 5.
- Knead for 2 minutes.
- Oil a large bowl.
- Tip the dough out onto the bench and shape it into a ball then place in the oiled bowl, cover and leave to double in size (about an hour).
- Pre-heat the oven to 220C fan-forced.
- Punch down the dough then cut in half.
- Roll each half into a large disc on a sheet of baking paper and prick with a fork all over.
- Bake for 7-9 minutes or until firm.
- Top the pizza then cook another 7-9 minutes.

Laurelle says
Hi Claire, I thought I might try this tonight I have a pizza stone,but how do I get the soft pizza with the toppings onto the stone that is hot in th oven.
Claire says
Hi Laurelle. I put the pizza base on baking paper and then use a pizza peel to slide it in but you can use a chopping board. What I now do is cook the base for about 5 minutes on its own, then add the toppings and pop it back. Makes it much easier!
Bruce says
Hi Claire, great website.
I have a great way to freeze pizza dough. I divide my dough into suitable portions, roll into balls and place on an oven tray and into the freezer. After about an hour, remove frozen dough balls, place in a plastic bag and back into freezer. I know this goes against conventional freezer wisdom, but it works really well. When I want a pizza base, I simply remove an individually frozen ball and thaw it wrapped tightly in plastic. The plastic keeps condensation off the dough and it emerges every bit as good as when it was made. Yummmm.
Bruce
Claire says
Thanks so much Bruce that's a great tip!
Cassandra says
Claire, have you tried the New Farm Deli cookbook pizza dough? thats the one I normally use and its soo good. We will have to compare :D
Claire says
I'd love to try it Cass!
Barbara @ Barbara Bakes says
Your pizza looks delicious. I made pizza just a few nights ago. It really is so easy in a Kitchen Aid.
Claire says
The KitchenAid makes everything so easy! Thanks Barbara.
Corrie says
Got to love playing with dough! I made pain d'epi this week....about 15 loaves all up. I am so full!!!!! :-)
Claire says
Wow Corrie how impressive!
Jennifer (Delicieux) says
Your pizza looks fantastic Claire! Ever since visiting New York last year I've been in love with the amazing thin crust pizza I had there and have been trying to reproduce it since.
Claire says
Give this recipe a go Jen it's seriously good!
Emilie says
Hi Claire,
I just stumbled upon your site and I can't wait to try out this pizza dough recipe. The crust looks lovely! It's the perfect balance between thick and thin!
Claire says
Welcome Emilie! It is the perfect balance you're right. Please let me know how you go!
The Café Sucré Farine says
Good job Claire - you've definitely conquered the "yeast monster" - bravo!!!!
Claire says
Thanks Chris! I have indeed.
Lorraine @ Not Quite Nigella says
That looks really good! And eek! Imagine if the stand mixer came come off the bench? I can imagine that would not be a pretty sight at all! :O thanks for the warning :)
Claire says
That would be a disaster!
Hotly Spiced says
Word press just ate my comment.
I will try again!
Hi Claire, great looking pizza. I just love the bit where you get to punch down the dough. I'm a thin crust pizza girl too but I could definitely manage your pizza. What a great dinner. Your husband is very lucky! xx
Claire says
Naughty WordPress! I shall tell him you said that!x
Maureen @ Orgasmic Chef says
105F ? You wrote that for me, didn't you? I'm learning celcius, I promise :) My first year in Australia my husband did all the cooking because he thought I couldn't cook. One day he was on the phone and I finished dinner and he hasn't cooked a meal since! (17 years!)
I've always been a thin crust person because I was hoping it would follow that my body would become thin from eating it. It hasn't happened so I'm trying your crust. Have a great weekend!
Claire says
Haha no just because it's easier to read the F on my little thermometer at low temps.
Wow he got out of it easily!
That's a great theory about the pizza crust. It didn't work for me either unfortunately. Have a good weekend!
Nic@diningwithastud says
YUM :) I vary with my dough choice depending on the toppings. I love homemade though. Its hard to go back to store bought when you've tried it
Claire says
It is indeed. This one rivals any I've bought I think.