
The four people who I told I had made woopie pies yesterday all reponded 'what are woopie pies?!' If you're also wondering what I'm on about then allow me to explain. A warning though, once you make these you'll be hooked. A woopie pie is like two cake-like biscuits sandwiched together with some sort of icing. The original woopie pie is chocolate with marshmallow filling. They are like a big version of the best part of the cupcake. All the crunch and filled with icing. They're also really simple to make (unless you're a perfectionist, then they're a little tricky).

From my Googling, I discovered that woopie pies originated in America (I could have guessed) and one theory is that they got their name because the men would shout 'woopie' when the women would bring them out to them in the fields. I have to say wooop-ieee pies with a deep south accent. That's how I imagine they were named. They also make me think of this cute little scene out of the little rascals.
Now you know all about them, on to the recipe. My friend Shannon sent me a link to the recipe at the Wheel & Barrow.

It looks like there are quite a few ingredients but this includes the icing ingredients.

Making woopie pies is just like making a cake or cupcakes with less liquid. The first step is to beat the butter and sugar together.

When the mixture is thick, light and creamy, add the egg.

Remove the bowl from the electric mixer and stir through the sifted flour, cocoa, bicarb soda and salt.

It takes a bit of muscle work but finally, stir through the buttermilk. Again, I used milk with lemon juice in place of buttermilk.

Line a baking tray with baking paper. I used two trays and made two batches for mine so make sure you have time for two rounds of cooking. Using an ice-cream scoop, spoon the mixture onto the trays. They don't spread too much but it's a good idea to leave a few centimeters between each one.

I learned after my first lot that if you don't smooth out the tops a bit they will be cracked when they come out of the oven. If you're going to put icing on top it's not that big a deal but I found smoothing the top out with my finger in a swirling motion seemed to stop them cracking. Bake the pies for 10-12 minutes or until they feel firm.

Cool the woopie pies on a cooling rack. You can see that the ones on the left are a lot more cracked than the ones on the right. I still need a bit of practice though. If you're wondering what the baby ones are for they were my taste-tester.

While they're cooling it's time to make the filling. Whip the egg white, syrup and salt until it's thick and doubled in size.

Then, slowly add the icing sugar and whisk until it's very thick and all incorporated. Alternatively, you could make any type of thick icing to fill them with. Next time I think I'll try out buttercream. The possibilities are endless!

When the pies are cool, match them up with a partner that is a close to equal in shape and size as you can get then flip over the uglier of the pair, it's going to form the base so you won't see it's cracked little face.

I put the filling in by spooning blobs into the middle then gently encouraging it out to the sides. I would add a bit more icing sugar to the filling as mine was a little too runny, although it did add to the indulgent feeling having it ooze out as you bite into the woopie pie.

Place the lid on top and you're done! I think traditionally this is where you eat the woopie pies but I have seen quite a few pictures, including the Wheel & Barrow picture, where they iced the top of the pie and decorated it.

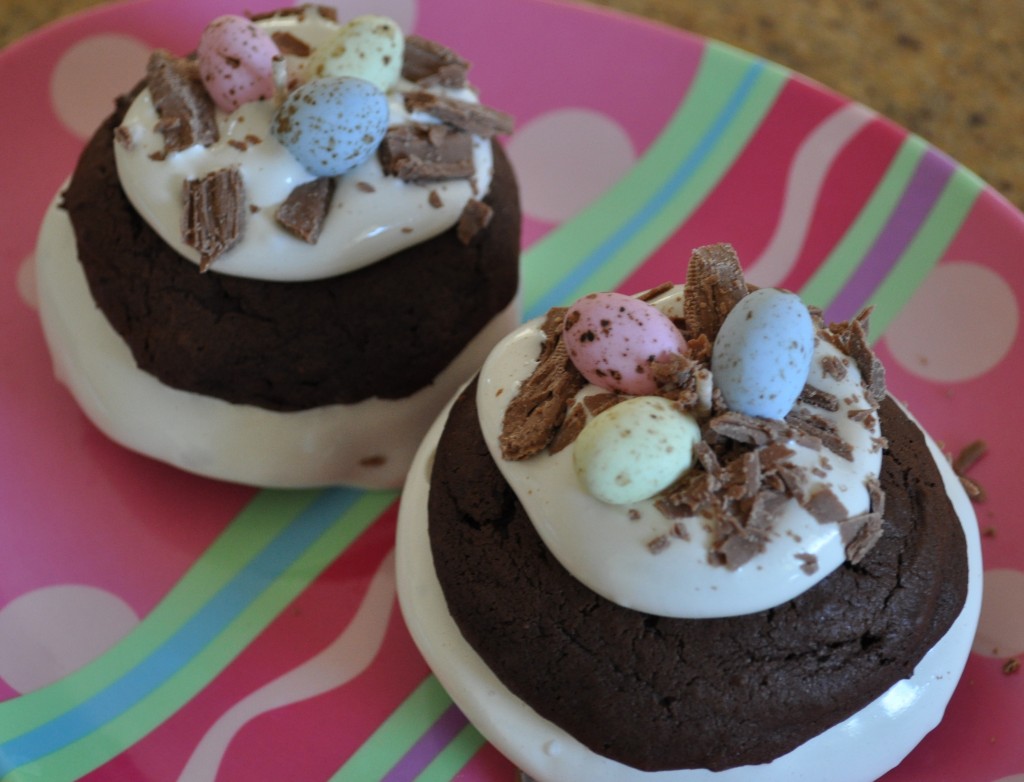
Little Easter egg nests were my chosen decoration. Yes if you look really closely you can see a toothpick in the middle. The slippery filling couldn't hold the weight of the top AND the eggs AND extra icing so it needed a little extra support. I probably should have cut it down but time was of the essence and I was envisaging a big mess a few minutes later. I was pleasantly surprised though. My two Easter woopies pies are still standing tall on my kitchen bench today.
To make the Easter topping I put another blob of filling on top, sprinkled it with crumbled Cadbury Flake bars and topped it off with some speckled eggs. Every year I forget how delicious those eggs are, just like giant m&ms. Yum! Enjoy!
Recipe
Ingredients
- 115 g 4oz butter softened
- 200 g 7oz soft dark brown sugar
- 1 teaspoon vanilla extract
- 1 large egg
- 280 g 10oz white plain AP flour
- 50 g cocoa powder
- 1¼ teaspoon bicarbonate of soda
- Pinch salt
- 225 ml 12oz buttermilk
- 70 g 2oz icing sugar
- 1 large egg white
- 225 g 8oz light corn or golden syrup
- Pinch of salt
- 2 Cadbury Flake bars
- 1 packet of speckled Easter eggs
Instructions
- Pre-heat the oven to 170C(340F) fan-forced and line two baking trays with baking paper.
- With an electric mixer, or hand-held mixer, beat the butter and sugar together until it's thick and creamy. Add the egg and mix until combined.
- Using a spoon, mix through the sifted flour, cocoa, salt and bicarb soda then mix in the buttermilk.
- Use an ice-cream scoop to spoon blobs of batter onto the baking trays making sure you leave a few centimeters between each blob. Smooth out the tops with your finger (or use the back of a spoon) and even them out so they're the same height all over.
- Bake for 10-12 minutes or until they're firm.
- Cool on a wire rack.
- To make the filling, whisk the egg white, syrup (I used golden syrup) and salt together until it's thick and has doubled in size. Gradually add the icing sugar and mix until it's totally incorporated.
- Match up the pies so that each one is paired with one similar in size and shape then turn over the uglier of the two to form the base. Spoon the filling on to the top of the base then top with the other half of the pie.
- To decorate Easter style, spoon a little more filling on top of the pie, sprinkle with crumbled Flake and top with speckled eggs. You might want to put a toothpick in the middle to hold it all in place.


Kankana says
yummy looking pies those are and I am sure you can't stop eating those once you star :)
molly kelly says
Very festive looking Bub abd Guppy said they were very yummy!! x
Shannon says
Yay! You made these. How was the icing? I have made something similar before and wasn't a fan of the marshmellow-y icing, but these might be different?
Claire says
I really liked the icing and I'm not a fan of marshmallows if that tells you anything. I would prefer buttercream though but I could eat it with a spoon!
Shannon says
Oh good! Really must make these now that you've tried and tested them for me! :P