
When I was at school, my lunchbox repertoire was pretty small. As annoying as my fussiness must have been, at least mum didn't have to brainstorm what to give me for lunch. The list of acceptable foods was only a few dot-points long.
Honey jumbles were on that list. I love the subtle spices and soft biscuit coated with sweet crunchy icing. I could have eaten them every day. I haven't had a honey jumble for years and years so when I came across a recipe for them I was eager to see if it evoked the same wonderful memories.

It did! The result was perfect. They are so close to the original that if I was a perfectionist and could make them the exact shape with smooth, even icing, I would have thought I was eating them out of the packet.
In honor of all the kiddies going back to school here is how you make my very favourite school biscuit.


The method for making honey jumbles is pretty similar to making gingerbread. Start by placing the butter, brown sugar and golden syrup in a saucepan and heating it, stirring, over medium heat until everything melts and it forms a smooth liquid.

Pour it into a medium-sized bowl and set it aside to cool for 10 minutes.

Stir in the egg yolk and then the sifted dry ingredients. You could probably do this with the dough hook on the mixer but if you're after a good arm workout, ok a little arm workout, stir it by hand with a wooden spoon.

Once everything has come together, turn the dough out onto a floured bench. Flour your hands and then knead the dough until it comes together in a smooth ball and is no longer sticky to touch.
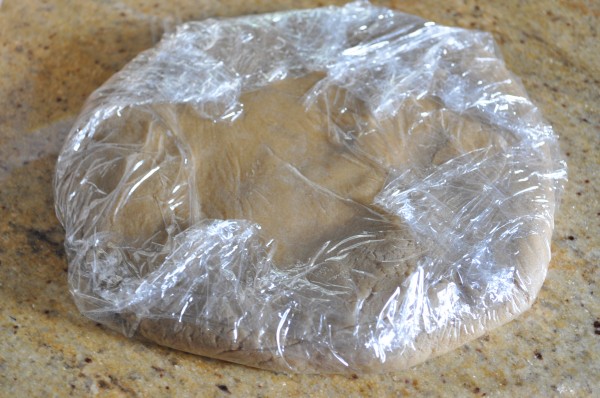
Shape the dough into a flat disk, wrap it in plastic wrap and throw it in the fridge for at least 30 minutes.

Take the dough out of the fridge and divide it into eight pieces. I found it much easier to section it out while it was still disc-shaped. Clearly I eat too much pizza.

Roll each wedge out into a 30cm log. I used a ruler for mine because I wanted them to be nice and equally-sized but you can just eyeball it and make sure they're all roughly the same length and width.

Cut each log into 5 pieces. If you're using the specific ruler method, each piece will be 6cm long.

Use your fingers to round the edges of each slice of dough and then place them on a lined baking tray at least 3cm apart. Bake the biscuits at 140C fan-forced for 15 minutes or until they turn golden.

Let them cool completely on the trays.

To make the icing, beat the egg white until it starts to foam then stir in the icing sugar and flour and add enough lemon juice to make it a good consistency. It needs to be pretty thick but still spreadable. Ice the biscuits and then leave the icing to set.

Honey jumbles last up to a week if you store them in an air-tight container and can be frozen. Enjoy!
What about you? What was your favourite biscuit growing up?
You might also enjoy our Lunchbox Milo Biscuits.

Recipe

Ingredients
Biscuit
- 60 g 2oz butter
- ½ cup 110g, firmly packed brown sugar
- ¾ cup 270g golden syrup
- 1 egg
- 2 ½ cups 275g plain AP flour
- ½ cup 75g self-raising flour
- ½ teaspoon bicarbonate of soda
- 1 teaspoon ground cinnamon
- ½ teaspoon ground clove
- 2 teaspoon ground ginger
- 1 teaspoon mixed spice
Icing
- 1 egg white
- 1 ½ 240g icing sugar
- 2 teaspoon plain AP flour
- 1 tablespoon lemon juice
- pink food colouring I just made mine all white
Instructions
- In a medium-sized saucepan, combine the sugar, butter and syrup and stir it over a low heat until everything has melted together.
- Transfer the mixture to a medium-size bowl and set it aside to cool for 10 minutes.
- Stir the egg into the mixture and then sift in the dry ingredients and stir them through.
- Sprinkle the bench top with flour and turn out the dough then knead it until it loses its stickiness.
- Form the dough into a disc shape and wrap it in plastic wrap and then refrigerate for at least 30 minutes.
- Pre-heat the oven to 140C(284F) fan-forced and line two oven trays with baking paper.
- Take the dough out of the fridge and divide it into 8 pieces. It's easiest to cut it up like a pizza.
- Roll each wedge into a 30cm long log and then cut each one into 5 6cm portions. I used a ruler to make them nice and even.
- Use you fingers to round out the corners and then flatten each one slightly and place on the baking tray leaving at least 3cm between each one.
- Bake the biscuits for 15 minutes and then leave them to cool on the trays.
- To make the icing, beat the egg white until it starts to foam then stir in the icing sugar, flour and enough lemon juice to make it spreadable. If you want to use two colours, divide the icing in two and tint one bowl with pink food colouring.
- Spread the icing over the cooled biscuits and leave them to set.
- Honey jumbles will keep in an airtight container for at least a week or they can be frozen.


Dianne Dunn says
Thank you Claire...I have made your honey jumbles several times and it is a family favourite. I change the shape to stars with silver balls scattered for birthdays and Christmas I colour the icing green and red. Very good recipe
Claire says
Oh yum!
Angela says
Hi,
I also loved Honey Jumbles and would love to make them. I do have a query though about your weight measurement for the plain flour. A standard cup of flour is 150 grams therefore 2 1/2 cups would be 375 grams. You have listed 275 grams....was this a typo? Do I use 275 grams plain flour or 375?
Thank you
Angela
Claire says
Hi Angela. They're delicious. Oh I'm sorry that's confusing. I would start with 275g and then add a bit more if it's too sticky.
Carol says
These were awesome. I made them as Mother's Day gifts so I cut them into hearts with a biscuit cutter. The really challenging part was getting them to the recipient without hubby and the kids devouring them all first. Bookmarking this recipe; it's a keeper!
Claire says
What a great idea Carol. They're delicious aren't they?
Matt says
Wow! I finally got around to making a batch. Awesome!!! I held off for a bit because Woolies finally started stocking them again, but I decided this morning that it was time to make my own. I halved the amount and found the dough was very wet, so needed a little extra flour. Maybe I miscalculated something, or maybe it just doesn't scale down well. No matter, the end result was just brilliant! Thanks :o)
Claire says
So glad you liked them Matt. I actually think they're better than the store bought ones but I might be biased :-)
Matt says
No, I agree, they are better. The best bit is, you can make them as big as you want. Who hasn't wanted a honey jumble twice the size?
Quick note: Honey jumbles twice the size are AWESOME!
Claire says
Now why had I never thought of that?! Brilliant!
Matt says
Every time I go to the supermarket I check next to the tick-tock biscuits to see if they've finally come to their senses and started stocking the honey jumbles again. These were by far my favourite biscuits as a kid and I was so disappointed when I could no longer find these on the shelves. I can't wait to give this recipe a go, thanks a million for posting! :o)
Claire says
Well Matt these are just like the ones we used to buy. I don't know why they stopped making them!!
Jess says
I made these last weekend and they were yummo! Question about making and freezing - can you freeze them once they are iced or do you freeze un-iced and then ice once thawed? Thinking about making them for my daughter's third birthday party and making ahead would be easier... Thanks!
Claire says
They're delicious aren't they? I'd freeze them un-iced and then ice them after they've thawed to room temperature.
Lorraine @ Not Quite Nigella says
Ooh I remember these! I loved the icing on top and they are doppelgangers for the bought ones Claire! :D Ahh nostalgic moment coming on... :P
Claire says
Thanks! They turn out so well.
Erin @ she cooks, she gardens says
These are gorgeous and your icing is so lovely and smooth!
I'm trying to think what my favourite bikkies were growing up, I think they would have to be macaroons, the fluffy coconutty variety. Mum used to make them extra chewy and it was always a delicious treat. Yum! Think I might have to dig up the recipe and make them again.
Claire says
Ooh they do Sunday good. I hope they feature on your blog. I have to say I was rather impressed with how the icing turned out.
Hotly Spiced says
How cute! I have never thought to make my own honey jumbles. Yours sure look like the real thing. They are gorgeous and I bet they disappeared in a flash!
Claire says
I'be tried a few recipes for these but these ones look and taste the most authentic.
Celia says
Honey Jumbles! I loved those growing up! I never thought to make them - and what a large batch you've made, Claire! :)
Claire says
They were my absolute favourite! I gave this batch to my cousins twins. They loved them!