
A few months ago I wrote about my friend Sarah's announcement that she is pregnant with twins! She is looking so fantastic and we're all exploding with excitement (yes this year is a seriously exciting one) to meet her two little girls. Last Saturday, I hosted a pretty-in-pink baby shower for the mother-to-be. The day was a huge success and Sarah was showered with love and gorgeous gifts.

I had so much fun making all the food and organising the whole thing and have lots of recipes to share. The first recipe and the one I was most proud of is cake pops. I've seen them all over the blogosphere but had put them in the too-hard basket. To me, anything that looks so fancy must be hard to make. I was wrong! Yes they are a bit tedious and take time but they're actually pretty easy to make yourself.

Could the ingredients be any simpler? Yes I usually like to make things from scratch but sometimes the easy and fast route is the way to go. It's probably less expensive to buy the mud cake than make it yourself considering how much a block of chocolate costs.

Start by removing the icing from the cake and discarding it (or using it for something else if you can think of something).

You can melt the white chocolate over the stove or do what I did and zap it in the microwave for 30 seconds at a time. It took 3 goes to make it nice and smooth. You will need ⅔ of a cup of the chocolate for this step. Pour it in and stir it through until it's well mixed in.

Working with a level tablespoon (or two teaspoons) of mixture at a time, roll it firmly into balls.

Place the balls on a baking paper lined tray. A little hint - make sure the tray fits in your fridge with the sticks poking out.

Melt another ¼ of a cup of the chocolate. Work with one stick at a time and dip it 2cm into the chocolate. Poke the stick into the batter ball and repeat with all the balls. Then it's time for them to harden up. You can put them in the freezer for 30 minutes or refrigerate them for at least 2 hours. I left mine in the fridge over night.

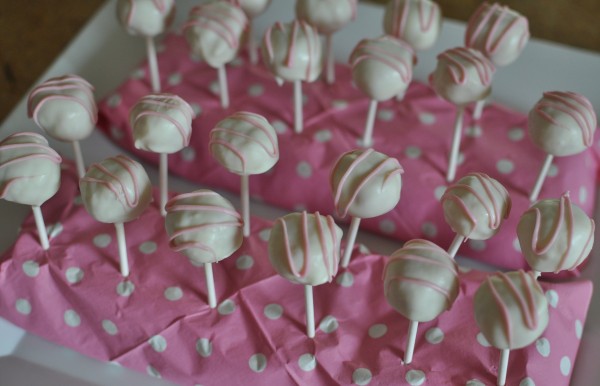
Set ⅓ of a cup of the chocolate aside and melt the rest of it. Now comes the fun dipping part. Working with one stick at a time, dip them in the white chocolate and turn them around until they're coated in chocolate. Tap the stick on the side of the bowl to remove the excess.

It's easiest to use a thick piece of styrofoam to stand the cake pops up but I couldn't find any. I improvised by using two up-turned egg cartons. Make the holes before you get the cake pops ready to stick in them or it could get messy. Leave them to set for 10 minutes and then it's time for decorating.

Melt the rest of the chocolate and add the colouring then spoon the coloured chocolate into a zip-lock bag. Cut a tiny piece off the corner of the bag.

Then get to work on decorating. You can get fancy with the design but I didn't want to mess them up so went with good old easy zig-zags.

Leave them to set for at least 10 minutes too.

I had heaps of pink white chocolate left over and couldn't bare to throw it out. I made a whole lot of little cake toppers out of it. All you need to do is put down a piece of baking paper and pipe whatever shapes you like onto it. When they're set put them in an air-tight container and they're ready for your next baking creation.

Cake pops don't need to be stored in the fridge and will last up to a week.

To display cake pops, it's easiest to use a thick piece of styrofoam or florists' oasis and cover it in a matching paper. I didn't have either of those so I covered my egg cartons. It was a bit tricky to make them all stand up straight but I think it worked rather well. Enjoy!
What about you? Have you made cake pops before?

Recipe
Ingredients
- ½ iced white chocolate mud cake
- 375 g 13oz packet white chocolate melts
- pink food colouring
- lollypop sticks
Instructions
- Remove the icing from the cake and throw it away.
- Use your hands to crumble the cake very finely.
- Place ⅔ of a cup of the chocolate melts in a heat-proof bowl or jug and melt them in the microwave. Heat them for 30 seconds at a time and stir between each one. It should take about 1minute - 1 minute 30 seconds to be smooth.
- Pour the melted chocolate into the crumbled cake and stir it through.
- Using two teaspoons of mixture at a time, roll it into firm balls and place it on a baking paper lined tray.
- Melt another ¼ of a cup of the chocolate.
- Working with one stick at at a time, dip the stick 2cm into the chocolate and then insert it into each ball.
- Put them all in the fridge for at least 2 hours or until they are firm or you can put them in the freezer for 30 minutes.
- Set ⅓ of a cup of the chocolate aside.
- Melt the remaining chocolate in the microwave until it is smooth.
- Working with one stick at a time, dip them in the melted chocolate and make sure they're covered. Tap the stick on the side of the bowl to remove any excess chocolate then stick it into an over-tuned egg carton or piece of styrofoam and leave it to set for at least 10 minutes.
- Repeat with the remaining balls. You may need to re-microwave the chocolate if it starts to harden.
- Melt the rest of the chocolate and add the pink colouring to it.
- Pour it into a zip-lock bag and cut off a tiny bit of the corner.
- Decorate the tops of the cake pops.
- Leave them to set.
- Stored in an airtight container, cake pops will last up to a week.


Natalie @ A Turtle's Life for Me says
This is my favorite cake pop post I think I've seen yet! Just shared it on my spotlight post! http://www.aturtleslifeforme.com/2012/03/sunday-spotlight.html
Claire says
Thanks Natalie and thanks for featuring me!
Hotly Spiced says
Oh Claire! These look so beautiful. You are a great friend to go to all this trouble for your friend. She must have been overwhelmed. I bet you had so much fun at the baby shower. I love the look of the dessert table and can't wait to see what delightful dessert you share with us next. Congrats on a huge effort.
Claire says
Thanks so much Charlie! I had so much fun doing it all for her. Now I just can't wait to meet the babies!
Jessica says
Oh wow - I can't believe I have never made cake pops, but this is the inspiration I need!
Claire says
If you can't find the sticks over there, you can get them online pretty easily. Look forward to seeing how yours turn out!
Jennifer | Mother Thyme says
These are soooo cute! I love them. I have yet to tackle the cake pop but you have inspired me to give them a try!
Claire says
Good luck Jennifer!
Sandra says
You make it look so easy Claire! I love eating cake pops and getting them to stay on the stick (even with the tip you mentioned) has been challenging. Using the egg cartons is a very creative idea, thanks a bunch. Love your dessert table.
Claire says
They are easy Sandra! I think dipping the sticks in chocolate first is the key. It acts a bit like cement.
The Cafe Sucre Farine says
Claire, bravo, bravo! Very pretty -I 'm sure your friend will have many sweet memories of her shower!
Claire says
Thank you Chris. I was a little bit proud of myself!
Lorraine @ Not Quite Nigella says
Oh how clever doing these with a bought cake! I bet she was thrilled! :D And I'd be tempted just to eat the icing :P
Claire says
It made it so much easier. Cheating I know but those mud cakes are actually pretty tasty (shh I didn't admit that). I quickly threw the icing in the bin like Miranda in Sex & The City.
Zane & Van | Spicy Beautiful says
Ooohhh... these pink cake pops are darn cute and sexy! Yummy!
Claire says
Why thank you! They were rather tasty too.
Daisy@Nevertoosweet says
Yay!!! The first recipe :) And i honestly did not know it was SO easy to make cake pops and you don't need a proper 'cake pop' stand you just need a egg carton ~
Thank you SO much! I'm so so so gonna try this recipe and WOW my friends next time hehe ~
Claire says
You are very welcome. It was a bit of a risk using the egg cartons but they turned out well. The riskier thing was the bowl of 24 eggs sitting in my fridge!
Jennifer (Delicieux) says
Your cake pops look adorable! As does that entire spread fo delicious treats.I've never made cake pops before, in fact, I don't think I've ever eaten a cake pop before either. I'm an old fashioned gal and like a slice of cake :)
Claire says
Thanks Jennifer! I know what you mean about a slice of cake. I like to have a greater ratio of cake to icing than a cake pop but they're still a fun way to eat it.