
Continuing on from my recent fruit baking obsession, I recently made orange and almond cake and decorated it with my new found butter cream icing skills that I learned over on I am baker. There are some great tips for making professional looking cakes in no time at all. The cake recipe is from Souvlaki for the soul and produces a lovely, dense, fruity cake. It's also gluten free.

Before you get started on the recipe the oranges need to be boiled until the skins are soft. It takes a least an hour. This was actually take two for me. The first lot I forgot to check and only realised all the water had evaporated and the oranges were burning when I smelled something odd! On the plus side it actually smelled like Christmas ham. Yum. You can boil the oranges the night before.

When the oranges have cooled, chop them up (including the peel) and discard the seeds.

Place the oranges and eggs in a food processor and pulse until smooth. I used my blender for this step.

In a large bowl, combine the almond meal, sugar and baking powder.

Gently whisk the egg/orange mixture into the dry ingredients until there are no more lumps.

Pour the batter into a lined spring-form tin and bake for 45 minutes to 1 hour in a 190C/375F fan-forced oven. Check the cake after 45 minutes using a cake tester.

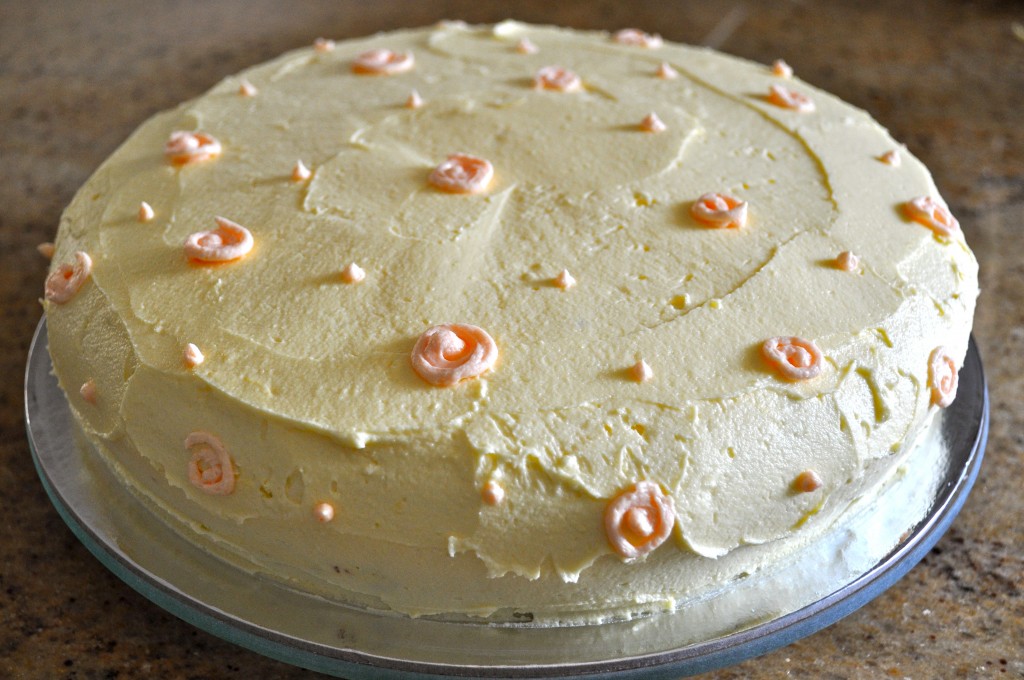
Leave the cake to cool in the tin for 10 minutes before transferring it to a wire rack to cool completely. The recipe says to dust with icing sugar to serve but I decided to make an orange buttercream icing and decorate mine. It's made using the same method as normal buttercream but using orange juice in place of the liquid.

I always thought that the crumb coat was a bit of a waste of time. When I decorate a cake I like to do it all in one go rather than a little bit now, leave it for hours then more later. I have to eat my words on that though because it makes a huge difference to the final cake. It's so much easier to ice and decorate when you have a nice layer of icing holding in all the crumbs. I didn't refrigerate mine between coats instead leaving it until the first layer was touch-dry.

Once the first layer has set it's time to ice it with the top layer. Use a spatula and spread the icing as evenly as possible. Of course you can decorate any way you like but I wanted to give a new technique a whirl.

Using a piping bag with a very small round nib attached, pipe little 'flowers' or spirals onto the cake. Mine weren't quite as neat as the ones in the lesson but I was pleased with the final effect.

Recipe
Ingredients
- 2 large oranges which have been boiled
- 6 eggs lightly beaten
- 250 gr 9oz of ground almonds
- 250 gr 9oz of caster sugar
- 1 teaspoon of baking powder
Instructions
- Boil the oranges, barely covered in water in a covered saucepan until the skins are soft. Once cooled, cut them open, remove any pips and chop into rough segments, including the rind.
- Preheat the oven to 175C/350F fan-forced and butter and flour a 24cm springform pan.
- Blend the oranges and eggs together in a food processor or blender.
- Mix the ground almonds, sugar and baking powder in a bowl and add the orange mixture and whisk it all together to combine.
- Pour the batter in the cake tin and bake for 45 mins to 1 hour.
- Leave the cake to cool in the tin for 10 minutes then transfer to a wire rack.
- Dust with icing sugar or decorate with orange buttercream icing.


tigerfish says
The cake looks so good! I can start eating even without the decoration.
Barbara Bakes says
I'm so interested in trying this recipe and cooking the oranges in the pressure cooker instead of on the stove. hmmmmm It looks so flavorful and delicious!
Claire says
That's a great idea. They'd cook in record time. You sure are having fun with your new toy!