
This cake is very very well named. It seems that when you bake it, a little devil invades your body making it impossible not to devour and off-cuts or leftover icing. The name doesn't describe the cake though. It is rich, smooth, chocolaty and heavenly. Made with cocoa instead of chocolate, it's less expensive to make than most indulgent chocolate cakes. It's also rather easy to whip up in an afternoon.

Do your prep and measure out all the ingredients and grease and line the tins. If you're a little short on time, make the icing first as it takes a little while to thicken.

Put the dark sugar and cocoa in a bowl that has a bit of room to spare.

Add the boiling water and whisk it all together then set it aside (I challenge you not to taste it!).

Cream the butter and sugar together until light and fluffy. In a separate bowl, combine the flour, baking powder and bicarb and set aside.

While mixing, dribble in the vanilla and mix until it's incorporated into the butter and sugar.

With the mixer still running, add one egg quickly followed by a scoop of the flour mixture. Then add the other egg (I have 4 eggs because I doubled the recipe).

Keep mixing and slowly add the rest of the flour.

Now it's time to add the main ingredient - the chocolate. Slowly add the chocolate mixture. I only added a little bit to the electric mixer then switched to doing it by hand.

Carefully fold the rest of the chocolate mixture through until the batter is smooth.

Divide the batter between the two cake tins and bake for about half an hour.

While the cakes are baking it's time to make the icing. Place the butter, dark sugar and water in a saucepan and heat over medium heat until the butter is melted and sugar dissolved.

When it starts to bubble, remove the pan from the heat and add the chocolate.

Add the chocolate and swirl the pan around. I was a little too uncoordinated to take a photo while swirling but the chocolate is in there I swear.

Whisk the icing until it is smooth and glossy then set aside. Nigella says to leave it for an hour, whisking occasionally but mine took at least 2 hours to start to thicken. The warmer weather increases the thickening time.

By now the cakes will be cooked so remove them from the oven and leave in the tins to rest for about 10 minutes.

Take the cakes out of the tins and leave to cool on a wire rack.

When the cakes have cooled it's time for the icing. Place one cake, top-side down on a cake plate (I put a little blob of icing on the tray first to hold the cake in place). If your cakes have risen a bit like mine, trim the tops off them.

Spread the cake with a generous amount of icing.

Place the second cake on top. Nigella says to put it on right side up. I had to trim mine a little so to make it easier to ice, I placed it trimmed side down.

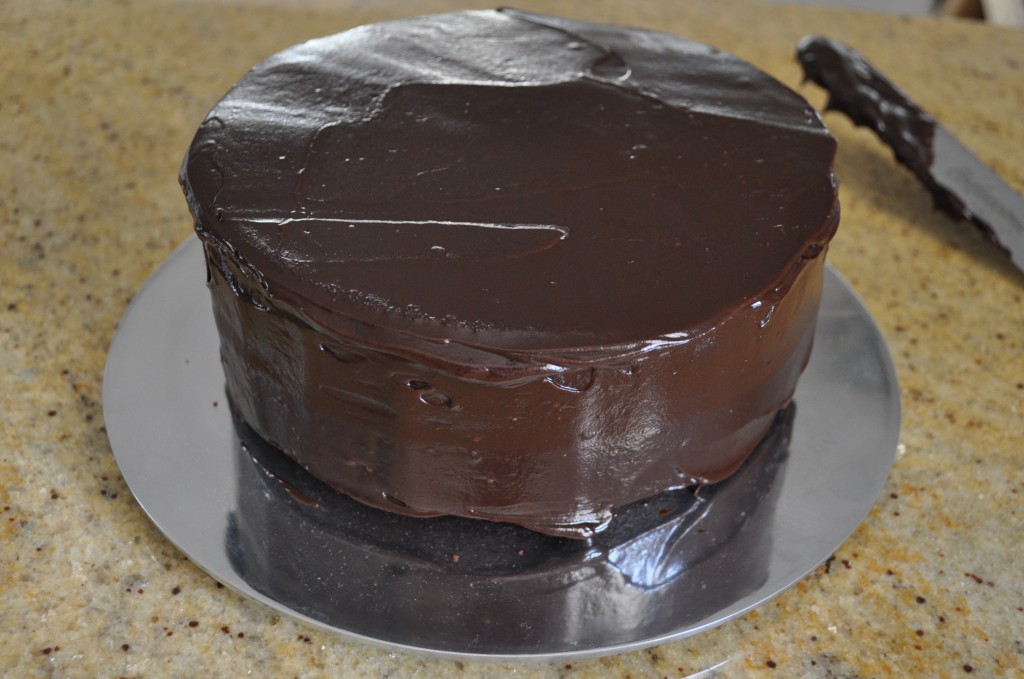
Using a palate knife, cover the cake with icing and smooth it over. Enjoy!

I used this recipe to make this cake for a 60th Birthday. Yum!
Recipe
Ingredients
- 50 g 2oz best-quality cocoa powder, sifted
- 100 g 3.5oz dark brown sugar (muscovado is suggested but I used dark brown)
- 250 ml boiling water
- 125 g 4oz soft, butter plus some for greasing
- 150 g 5oz caster sugar
- 225 g 8oz plain flour
- ½ teaspoon baking powder
- ½ teaspoon bicarbonate of soda
- 2 teaspoon vanilla extract
- 2 eggs
- 125 ml water
- 30 g 1oz dark brown sugar
- 175 g 6oz unsalted butter, cubed
- 300 g 11oz good-quality dark chocolate, finely chopped
Instructions
- Preheat the oven to 180C/360F. I couldn't find whether this was fan-forced temperature so I set my oven to 170C/340F just in case. Grease and line two small round cake tins.
- Put the cocoa and 100g (3.5oz) dark sugar in a bowl with a bit of space to spare and our in the boiling water. Whisk to mix then set aside.
- Cream the butter and caster sugar together until pale and fluffy.
- In another bowl, stir the flour, baking powder and bicarb together in another bowl and set aside for a moment.
- Dribble the vanilla extract into the creamed butter and sugar mixing all the while. Drop one egg quickly followed by a scoop of the flour mixture then the other egg.
- Keep mixing and incorporate the rest of the dry ingredients for the cake then mix and fold the cocoa mixture scraping the bowl well with a spatula.
- Divide the batter between the two tins and bake for about 30 minutes or until a cake tester comes out clean. Leave the cooked cakes in the tins for 5-10 minutes before transferring to a wire rack to cool.
- As soon as the cakes are in the oven, get started on the icing. If you're in a hurry, make the icing before you start the cakes as it takes about 2 hours to thicken (that's in hot Brisbane, it would take less time somewhere cooler).
- Put the water, 30g (1oz) dark sugar and 175g (6oz) butter in a pan over a low heat to melt. When the mixture begins to bubble, take the pan off the heat and add the chopped chocolate, swirling the pan so all the chocolate is heated. Leave it for a minute or two and then whisk until the icing turns smooth and glossy.
- Nigella says to leave it for about an hour whisking every now and then. Mine took at least 2 hours to thicken significantly.
- To make Nigella's double layer cake, set one of the cooled cakes with the top side down (you may need to trim it a little) on a cake stand or plate and spread with ⅓ of the frosting.
- Top that with the second cake, regular way up and spread the remaining frosting over the top and sides.
Notes
!Nigella says that un-iced cakes can be frozen on the day of baking (double cling-wrapped and then wrapped in alfoil) and defrosted unwrapped on a wire rack when you're ready to eat them.


Kaitlyn says
I've just made two of these babies to be stacked up for my partners birthday tomorrow night, they look so rich and fluffy!
I'm hoping to try a chocolate collar around mine, I would normally keep it on the counter top but with the chocolate collar I'm wondering whether to keep it chilled? Would the cool affect the icing too much?
Thanks!
Claire says
Sorry if this is a little late Kaitlyn! I think it would be find in the fridge. Good luck!
Alex says
oh how I love this cake! I've made it multiple times and it's always so moist, even 2 or 3 days after! The only problem I've encountered is with the icing. When I make it, it's dark and glossy. Then I leave it to harden while I get on with baking the cake. When it's cool, I put cling film on it so it touches the surface of the chocolate. When I go back to the icing (some hours later) and get the spatula onto it, it's grainy. I would love to know what I'm doing wrong...
Claire says
Hmm that's odd about the icing Alex. I don't know what it could be. Unless there's a little bit of condensation that gets in under the plastic wrap?
Alex says
So how do I best cover the icing before I'm ready to use it? While it's cooling do I just leave it uncovered? Considering how long it takes to cool and harden I'm a little apprehensive about leaving it uncovered...
Thanks so much for your quick reply!!
Alex
Claire says
Hi Alex. While it is cooling to be ready to spread you don't need to cover it. If you're going to wait to ice it for a while after it has cooled, cover with cling wrap. You might have to heat it to soften a little bit.
Alex says
Alrighty! I'll do that next time! Actually tomorrow...wish me luck! Crossing all fingers and toes...should I kiss a leprechaun for good luck? You know, just to be sure, to be sure??
Claire says
Haha if you can find one why not?!
Ihjaz Ahmad says
Oooh i made something very similar a few months ago, and it was delicious! Loved seeing how you had a different take on it. I’m definitely making this! thanks for sharing!
Pamela says
Hello, I was looking for the calories per slice for this cake & found your lovely site. I have made this cake twice once for a child's fete and last night for my husband's birthday. It is always yummy - but never as beautiful as yours. Btw, I can't seem to get mine to rise very well - especially like yours.
Any suggestions.
Take care. :)
Claire says
I'm glad you like the chocolate cake. It's a goodie that one!
I have a few suggestions about what could be causing the lack of rising:
- the rising agent could be a bit old (either the baking powder or the baking soda)
- could be your climate (where do you live?)
- the mixture could have been mixed a bit too much. It's best to beat the batter until everything is just combined.
Avanika (Yumsilicious Bakes) says
What a gorgeous setting, I love how you made it!! The cake looks gorgeous, I'd love to have a slice or two :)
Claire says
Thanks Avanika. Yes unfortunately it's one of those cakes that you can't stop at one slice. Dangerously irresistible.
Shan says
That icing looks so shiney and tasty!
Claire says
Trust me it tastes even better. Damn Nigella and her irresistible chocolate recipes (and my lack of self control)!
Julie M. says
Now that is a beautiful cake. I love how you made it look like a Charlotte as well. Well done! Enjoy the party!
Claire says
Thanks Julie. I was a little bit proud of this one myself.
Lorraine @ Not Quite Nigella says
I'm on a temporary chocolate ban and these pictures are just hurting me! Oh that glistening icing! That dense chocolate cake...