
On Saturday morning the wedding festivities truly began when my Auntie and Uncle (or Tia and Tio as we call them) arrived all the way from Madrid, Spain. Of course we had a family dinner in honor of the occasion and mum asked me to bring dessert. I thought something a little bit Australian would be a good way to welcome them. Naturally my mind went straight to pavlova.

I have gotten a little fancy with pavlovas, making Bill Granger's brown sugar pavlova last year, but I remembered seeing a chocolate version in my pile of magazine clippings and when I finally got my hands on it, I knew it was the one. Chocolate meringue topped with lashings of whipped cream, swirled with butterscotch sauce and finished with grated chocolate and a hint of seasalt. That's how I'd described it on a menu along with 'you must order this or you will regret it.' It was every bit as delicious as it sounds. If I didn't have to fit into a wedding dress this weekend (!!!) I would have gone back for seconds. Somehow the cream negates the sweetness of the dessert making it perfectly balanced and the different textures are nom, nom, nom.

There's not too much to making this. I was having a bride moment when I took the photo and missed the sugar. Oops. These are just the ingredients to make the meringue base.

Start by whisking the egg whites together in the bowl of an electric mixer until soft peaks form.


Keep the mixer running and add the sugar in six lots. Make sure each lot of sugar is well incorporated before adding the next one. Keep beating the mixture until it is thick and glossy.

Now add the cocoa, cream of tartar and vinegar and beat until they are just mixed in. I actually mixed in the cream of tartar and vinegar firstly and then added the cocoa so I could leave it as a bit of a swirl rather than all over brown.

Take the bowl off the stand and gently fold through the chocolate chunks. Yes they are broken up Easter eggs. I always use them for a bit of cooking after Easter.

On a sheet of baking paper, trace around the serving platter you want to use. Lay the baking paper on an oven tray and then heap the meringue batter on top. It will expand so leave a space between the edge of the mixture and your border. Put the pavlova in an oven pre-heated to 160C and then immediately turn the oven down to 130C fan-forced. Bake it for 1 hour or until it starts to crack and the outside is hard. Open the oven a little bit and leave it to cool completely in the oven. It will take a few hours.

Here it is all nice and cracked and delicious looking. Resist eating it.

To make the butterscotch sauce, put all the ingredients in a saucepan and heat it over medium heat until everything has melted/dissolved. Bring the pot to a boil and the reduce to a simmer. Let it simmer away, stirring occasionally until it thickens. It takes at least 15 minutes. Mine took more like 30 but I wanted it nice and thick. Set it aside to cool.

Assemble the pavlova just before you want to serve it so the shell stays nice and crispy. Yes you can see a little bit of baking paper under mine. I couldn't get it off the paper without destroying the whole thing so I just cut around it. I wouldn't do it at a fancy dinner party but family don't mind these things.
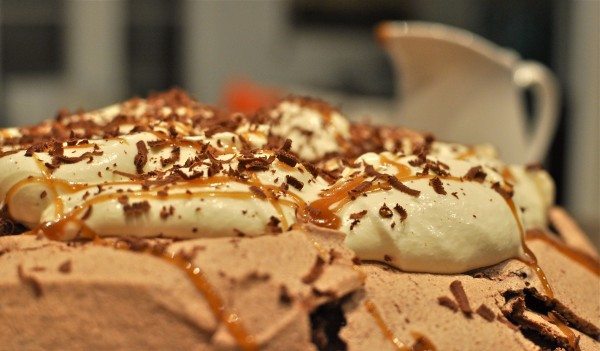
Pile it high with the vanilla whipped cream.

Drizzle the butterscotch sauce over the top.

Sprinkle the chocolate flakes and sea salt over the pavlova to finish it off.

Try not to eat the whole thing at once. Enjoy!
What about you? What would you make for dessert if you had foreign visitors?
ps 4 more sleeps til the wedding!

Recipe
Ingredients
Pavlova
- 6 egg whites
- 300 g 11oz caster (superfine) sugar
- 3 tablespoon cocoa powder
- 1 tablespoon white vinegar
- ½ teaspoon cream of tartar
- 75 g 3oz good quality dark chocolate, chopped
- 600 ml 1.3lbs cream, whipped with 1 teaspoon vanilla extract to serve
- 2 tablespoon good quality chocolate grated to serve
- ½ teaspoon crushed sea salt to garnish
Butterscotch sauce
- 150 ml 5ozcream
- 75 g 2.5oz butter
- 150 g 5oz brown sugar
- 1 tablespoon butterscotch schnapps
- 1 teaspoon vanilla extract
- pinch of sea salt flakes
Instructions
- Pre-heat the oven to 160C(320F) fan-forced and line a tray with baking paper. Trace around a plate onto the baking paper to make an outline for the meringue base.
- Beat the egg whites in the bowl of an electric mixer until soft peaks form. Add the caster sugar in 6 batches, beating for 20 seconds between additions.
- Continue to beat until the mixture is thick and glossy.
- Add the cocoa, vinegar and cream of tartar and whisk just until they are mixed in.
- Take the bowl off the mixer and gently fold through the chopped chocolate.
- Scrape the meringue out of the bowl onto the circle on the baking paper. It will expand so leave at least a one centimeter space between the meringue and the border. Smooth out the top and sides.
- Put the pavlova in the oven and turn it down to 130C(266F) fan-forced. Bake it for 1 hour or until it has cracked and is hard on the outside.
- Turn off the oven and open the oven very slightly. Leave it to cool completely in the oven. It will take at least 3 hours.
- Make the butterscotch sauce but combining all the ingredients in a small saucepan. Heat the mixture, stirring, until everything has dissolved and then bring it to a boil.
- Reduce to a simmer and cook, stirring until it thickens. It will take at least 15 minutes.
- Transfer the sauce to a jug and leave it to cool.
- To serve, pile the pavlova with whipped cream, swirl through the butterscotch sauce and sprinkle it with the grated chocolate and salt flakes.
- Serve immediately.
Notes


The Café Sucré Farine says
Claire, you are the cooking-est girl! I can't believe your making dessert a week before the wedding! Bravo to you! This looks fabulous - will you make it if I come and visit?
Claire says
Thank you Chris! That was the last thing I'll make before the wedding. We have lived out of the freezer so far this week. Yes of course. I'll make anything you like!
Lorraine @ Not Quite Nigella says
That looks amazingly gooey! And I can't believe it's almost the big day! :o
Claire says
I know! Just 4 sleeps!
Nic@diningwithastud says
OH!! YUM :D This just sounds tooth achingly delicious
Claire says
That's a pretty accurate description!
Ness says
Oh, Claire. Claire, Claire, Claire. Why do you do these things to me??! All the best for the wedding :)
Claire says
Sorry Ness. It must be because I can't wait to indulge after I've fitted into the wedding dress (not that I've really been holding back)!