
I hope everyone has as big a chocolate hangover as me today. Easter and being a bride very soon do not go all that well together. Apart from eating too much chocolate I had a lovely day with family and friends and fabulous food.
We're up at Sunshine Beach for the long weekend staying with my parents at our wedding venue (their house). Whenever we come up I like to bring mum and dad a little present and being me, it's usually something homemade and edible.
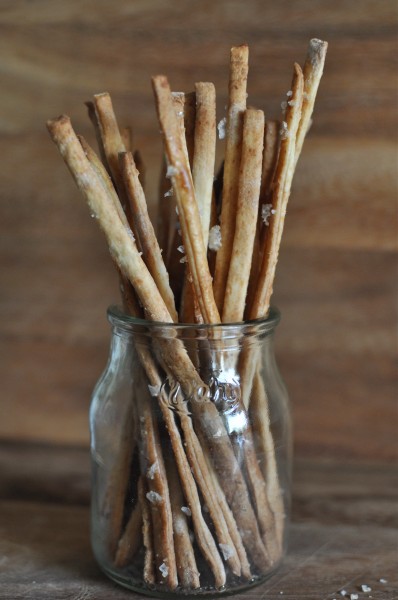
When I was on my grand tour of South America with the family earlier in the year, dad fell victim to an addiction. Don't worry too much it wasn't a terrible addiction, he became addicted to breadsticks. At lunch and dinner on the cruise, a glass full of breadsticks was placed on the table. It was like the never-ending packet of Timtams from that ad. As soon as you finished the last stick, a new glass full would arrive.

Dad absolutely loved them and I have to admit, they were pretty tasty. One of my favourite things on the boat was the cooking demonstration and the little book of recipes we got after it which included the recipe for those delicious bread sticks. So that was what I brought dad for Easter, a box of breadsticks. They were pretty easy to make and just as tasty as the originals on the boat.

I think the large quantity of butter that goes into these babies might have something to do with their delicious flavour.

Throw all the ingredients in the bowl of an electric mixer and mix everything together using the dough hook. Once everything is mixed together continue kneading for at least five minutes. You can also knead the dough the old fashioned way.

Once the dough is well kneaded, smooth the dough into a ball and place it in a greased bowl. Cover the bowl and set it aside in a warm place for an hour.

Roll the dough out using a pasta roller until is is about half a centimeter thick. I had a little bit of trouble with this step because the dough was so greasy. If you flour it lots it shouldn't break up. Only put it through each setting a maximum of two times. It's not like pasta where you have to keep rolling it through until it's nice and smooth. You're just putting it through to flatten it out.

Once you have the flat sheets, cut them to whatever length you want the bread sticks and then cut them into strips using the fettuccine attachment and lay them out with a little gap between each one on a lined baking tray.

Brush them with egg wash (I didn't want to waste an egg so just used some milk) and sprinkle generously with salt. You could sprinkle them with some herbs too if you like. Leave them to rest for 10 minutes and then bake at 220C fan-forced for 10 minutes or until they are golden.

Mine only took about 7 minutes to get to this stage (almost burnt) so keep an eye one them. Leave them to cool on the tray for a minute and then transfer them to a wire rack to cool.

Serve them up once they've cooled or store in an airtight container. Enjoy!
What about you? How was your Easter?

Recipe
Ingredients
- 200 g 7oz bakers flour (you could use plain flour)
- 6 g 2 teaspoon fresh yeast
- 2 g ⅓ salt
- 5 g 1 ½ teaspoon sugar
- 75 g ⅓ cup butter, softened
- 60 ml ice cold water
- 1 egg beaten to brush the breadsticks
Instructions
- Combine all the ingredients in the bowl of an electric mixer and beat with a dough hook until everything is combined and then continue to knead for 5 minutes.
- Place the dough in an oiled bowl, cover it and leave it in a warm place for at least an hour.
- Use a pasta machine to roll the dough out until it is about half a centimeter thick and then cut it using the fettuccine cutter.
- Lay the pieces out on a lined baking tray leaving a little gap between each one and making sure each piece is straight.
- Brush each one with the egg wash and sprinkle generously with sea salt.
- Leave the sticks to rest for 10 minutes in a warm place and pre-heat the oven to 220C (428F) fan-forced.
- Bake the breadsticks for 5-10 minutes or until they are crispy and golden brown.
- Leave them to cool on a wire rack and then transfer to an airtight container.
Nic@diningwithastud says
Haha, I can see why your dad would love them. Stick me in front of breadsticks and I can chow down for ages lol. They look so great Caire :) fab job!
Claire says
You two could fight over them!
Inspired2cook says
They look like crunchy deliciousness!! YUM!
Claire says
They are Barbara they are!
molly kelly says
They were most delicious Bub! xx
Claire says
Thanks mum! x
Lorraine @ Not Quite Nigella says
That's great that you now have recipes to help you remember the lovely times you had on the ship! And I bet your dad was very pleased with his gift! P.S. Happy Chocolate Hangover! :P
Claire says
He was rather pleased! They didn't last long.